Le
Petite Van Gris Part 4
Surprisingly, I have been quite busy doing bits of
things but nothing much to write about. I have been playing with my LE
Velocette. It required a new battery and two new cooling fans bought for £1.57
each plus postage. They are Maplins 92mm x 25mm, as cheap as I could get on
e-bay. I had fitted the pin connectors when I installed the first ones about 20
years ago and so replacing the old ones was quite quick and easy. Going for a
test ride I was giving a bit of throttle bit to check the carburetion after some
adjustments and blew off an oil pipe to the oil cooler dumping the contents of
the sump on the road. I have now removed the oil cooler until I can get a
better way of ensuring the pipe stays on the fitting. Jubilee clips on a straight
shank do not keep this rubber pipe on under pressure. I am getting out a couple
of times a week on the Kawasaki for a ride around. I find it difficult when you
have so few places open and even those have no toilet facilities available when
you get there.
I have spent some time working on bits for the van.
The engine covers are being stored in the van while I am trying to decide what
to do with the engine. This one has a heavier flywheel which will suit the van
better but the original engine has composite covers and this makes the engine
much quieter. Both are in need of a bit of TLC. I have created the wiring
harness and wired in the LED reversing and fog lamps.
The original handbrake bracket in the cab was
removed for use in a kit car. I am taking the opportunity to reposition it for
my convenience to the right of the gear lever and turn it through 90 degrees so
it points at the right angle as I did with the Burton. I had to do a bit of
modifying by adding suitable brackets to mount it under the parcel shelf.

I contacted Burton to see if I could get some door mechanism parts. It took a while for them to respond but were not able to supply me with what I needed. I would have to just make it myself. I used the Burton rod system to secure the bottom part of the tailgate.
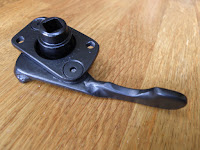
The starting point was a boot lid handle and lipped boss. The lipped boss became the internal door handle and things moved on from there. I used 8mm mild steel bar with stainless steel bar for the ends, a couple of oilite bushes pressed into alloy blocks and a couple of hex bar connecting pieces. All suitably machined by my good friend Bob who lives not far from me. He has the facilities to do the required engineering.
I spent a few days working the mild steel bar to the right shape to fit the inner door handle and got it all assembled. I need to paint the bar at some point but that can wait until the body is painted. It will need to be removed for that anyway.
It has now been fitted to the tailgate and works a treat. I surprised myself that it just needed a little tweaking to get it to work smoothly. I now have a secure lockable door mechanism that can be opened from the inside.


